 Python Development
 PHP Development
 React Js Development
 Vue Js Development
 Node Js Development
 Angular Development
 Continuous Integration
 Automated Deployment
 Monitoring and Logging
 Security Integration
 Backup and Recovery Automation
 Collaborative Tools Integration
 RPA Strategy and Roadmap
 RPA Tool Selection
 RPA Bot Development
 RPA Maintenance and Support
 Custom RPA Solution
 RPA Vendor Assessment
 AWS Lambda
 Amazon DynamoDB
 AWS CloudFormation
 Azure Deployment
 DNS Mapping
 Data Visualization
 Big Data Processing
 Data Modeling
 Database Administration
 Cloud Data Services
 Data Migration
 ETL Orchestration
 Data Collaboration
 Responsive Web Design
 Web Redesigning
 Mobile App Design
 UI/UX Design
 Wordpress Theme Design
 Online Portfolio Design
 SEO
SEO SMO
SMO PPC
PPC ORM
ORM
Vue x
Vuex is a state management library for Vue.js, a popular front-end JavaScript framework. It provides a centralized store for managing the state of an application and facilitates communication between components.
### It is a self-contained app with the following parts:
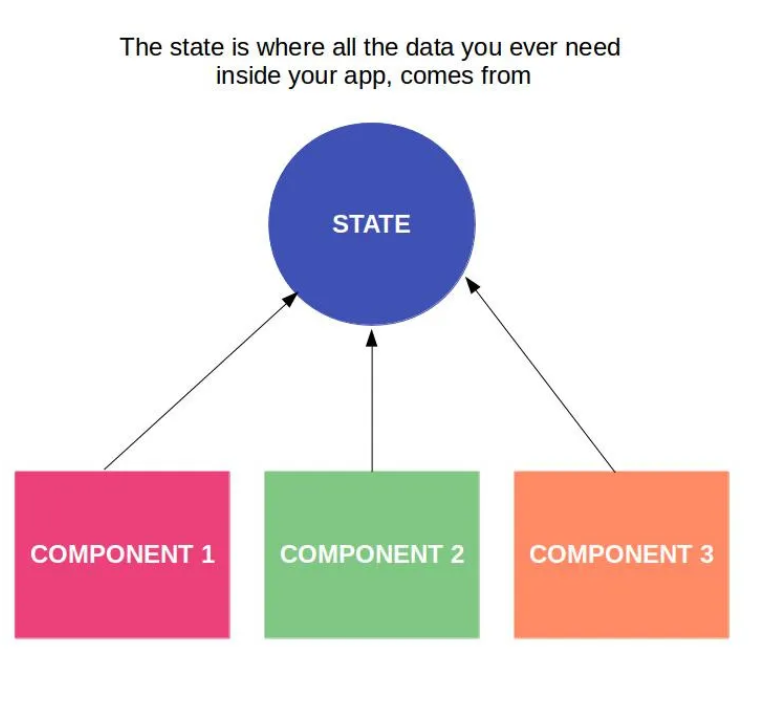
- The state, which is the source of truth that drives our app;
- The view, which is just a declarative mapping of the state;
- The actions are the possible ways the state could change in reaction to user inputs from the view.
Why you use and do not use Vuex?
If you’ve never built a large-scale SPA and jump right into Vuex, it may feel verbose and daunting. That’s perfectly normal – if your app is simple, you will most likely be fine without Vuex. A simple store pattern may be all you need. But if you are building a medium-to-large-scale SPA, chances are you have run into situations that make you think about how to better handle state outside of your Vue components, and Vuex will be the natural next step for you. There’s a good quote from Dan Abramov, the author of Redux:
Vuex: Vuex has 3 fundamental parts for its functioning:-
1. State
If you are using Vuex, then you will have only one Single store for each VueJS powered application. Vuex Store is Singleton source of State. Our store contains application state. State management in VueJS with Vuex is straightforward. You just need to modify the state via dispatching the action and not directly because we want to predict the future states. Our store contains application state.
2. Mutations
There is the only way to change the state in a Vuex store is by committing a mutation. We can change the state directly, but we will not do it because we need a snapshot for every project step. We need to predict the next state. For debugging, we will not mutate the state directly, but via mutations.
3. Actions
Actions are similar to mutations, the differences being that:
- Instead of mutating the state, actions commit mutations.
- Actions can contain arbitrary asynchronous operations.
Adding Vuex to your Application :-
To add Vuex you can either do it through CDN links or preferably add it by running the following in your terminal in your project directory.
npm install vuex
or
npm add vuex
Now Create a vuex store
Next step will be to create our Vuex store:-
So in the src directory, create one folder called the store.
In that, create a file called store.js
//store.js

import Vue from 'vue'
import Vuex from 'vuex'

Vue.use(Vuex)

export default new Vuex.Store({
    state:{
    },
    getters:{
    },
    mutations:{
    },
    actions:{
    },
    modules:{
    }
})
Here, I have imported Vuex store. We just pass this store, while creating vue instance in the main.js file.
import Vue from 'vue'
import App from './App.vue'

Vue.config.productionTip = false

new Vue({
  store,
  render: h => h(App)
}).$mount('#app')
So now our vuex setup is ready as we are going to create a todo app, Create a component named TodoList.vue
//TodoList.vue

<template>
    <div>
         Todos List
    </div>
</template>

<script>
export default{

}
</script>
<style>

</style>
Our TodoList.vue component is created now we have to import it in the App.vue
//App.vue

<template>
    <div>
        <TodoList/>
    </div>
</template>

<script>
import TodoList from './components/TodoList.vue'
export default{
    components:{
        TodoList
    }
}
</script>
<style>

</style>
Now we have to create another component for Todo called Todo.vue
//Todo.vue

<template>
    <div>
        Todo
    </div>
</template>

<script>
export default{

}
</script>
<style>

</style>
import this Todo.vue component inside TodoList.vue
//TodoList.vue

<template>
    <div>
        <Todo/>
    </div>
</template>

<script>
import Todo from './components/Todo.vue'
export default{
components:{
     Todo
    }
}
</script>
<style>

</style>
Next we a component for input field , Create a component name TodoForm.vue and import it in App.vue
//TodoForm.vue

<template>
    <div>
        TodoForm
    </div>
</template>

<script>
export default{

}
</script>
<style>

</style>
Now we have to add state in store.js named todos , which can be used by all the components.
//store.js

import Vue from 'vue'
import Vuex from 'vuex'

Vue.use(Vuex)

export default new Vuex.Store({
    state:{
        todos:[
            {
                title: "todo item a",
                completed: false
            },
             {
                title: "todo item b",
                completed: false
            }
        ]
    },
    getters:{

    },
    mutations:{

    },
    actions:{

    },
    modules:{

    }
})
Now we gonna fetch this Todo state in TodoList.vue component.
we can access this component using $store object
//TodoList.vue

<template>
    <div>
         <Todo v-for="(todo,index) in todos" :key="index" />
    </div>
</template>


<script>
import Todo from './components/Todo.vue'
export default{
components:{
    Todo
}
}
</script>
<style>

</style>
now Todo.vue component will accept props
//Todo.vue

<template>
    <div>
        {{todo.title}}
    </div>
</template>

<script>
export default{
props:['todo']
}
</script>
<style>

</style>
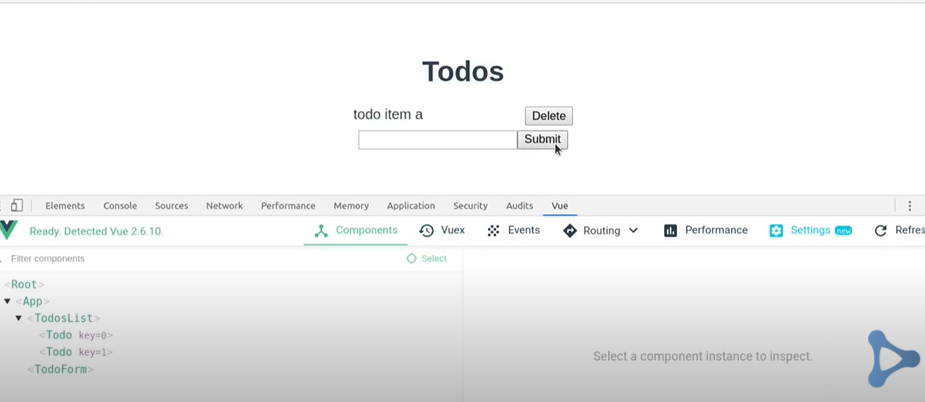
Next we have to add a Todo form to add a item in todos, create a input form in TodoForm.vue
//TodoForm.vue

<template>
    <div>
        <input type="text" v-model="newTodoItem"/>
        <button>Submit</button>
    </div>
</template>

<script>
export default{
data(){
    return{
        newTodoItem:""
    }
}
}
</script>
<style>

</style>
So now Todo form is added,now we want to add a new todo added in state on button click with the help of actions mutations
//TodoForm.vue

<template>
    <div>
        <input type="text" v-model="newTodoItem"/>
        <button @click="addNewTodoItem()">Submit</button>
    </div>
</template>

<script>
export default{
data(){
    return{
        newTodoItem:""
    },
},
methods:{
    addNewTodoItem(){
        this.$store.dispatch('addNewTodo',this.newTodoItem);
        this.addNewTodoItem=""
    }
}
}
</script>
<style>

</style>
Now will create this method inside the Action in store.js
//store.js

import Vue from 'vue'
import Vuex from 'vuex'

Vue.use(Vuex)

export default new Vuex.Store({
    state:{
        todos:[
            {
                title: "todo item a",
                completed: false
            },
             {
                title: "todo item b",
                completed: false
            }
        ]
    },
    getters:{

    },
    mutations:{
        NEW_TODO(state,todoItem){
            state.todos.push({
                title:todoItem,
                completed: false
            });
        }
    },
    actions:{
        addNewTodo({commit},todoItem){
            commit('NEW_TODO',todoItem);
        }
    },
    modules:{

    }
})
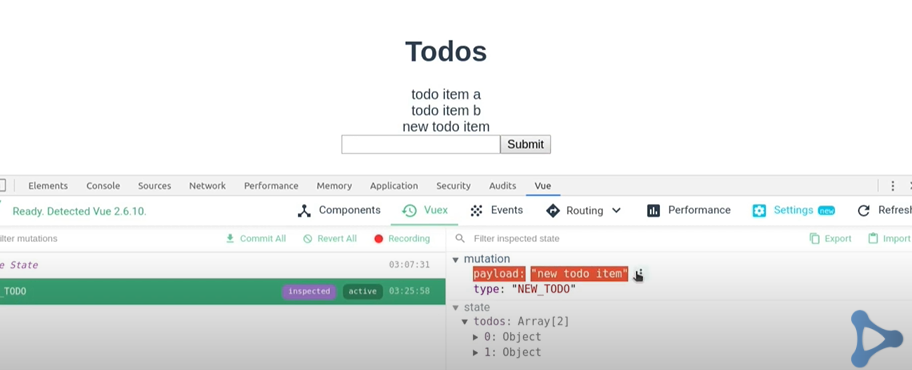
Here we have the output in which, if we add new item in input then that item will be added in todo list
Next we have to add delete item part.
We have to add a delete todo button in Todo.vue component. and use the action and mutations in store.js
//Todo.vue

<template>
    <div>
        {{todo.title}}
        <button @click="deleteTodo()">Delete</button>
    </div>
</template>

<script>
export default{
props:['todo']
},
methods:{
deleteTodo(){
    this.$store.dispatch('deleteTodo',this.todo)
}
}
</script>
<style>
</style>
Now create the mutation and actiion part for delete item in store.js
//store.js

import Vue from 'vue'
import Vuex from 'vuex'

Vue.use(Vuex)

export default new Vuex.Store({
    state:{
        todos:[
            {
                title: "todo item a",
                completed: false
            },
             {
                title: "todo item b",
                completed: false
            }
        ]
    },
    getters:{

    },
    mutations:{
        NEW_TODO(state,todoItem){
            state.todos.push({
                title:todoItem,
                completed: false
            });
        },
        DELETE_TODO(state,todoItem){
            let index= state.todos.indexOf(todoItem)
            state.todos.splice(index,1);
        }
    },
    actions:{
        addNewTodo({commit},todoItem){
            commit('NEW_TODO',todoItem);
        },
        deleteTodo({commit},todoItem){
            commit('DELETE_TODO',todoItem);
        }
    },
    modules:{

    }
})
Now we can delete the todoItem
OUTPUT
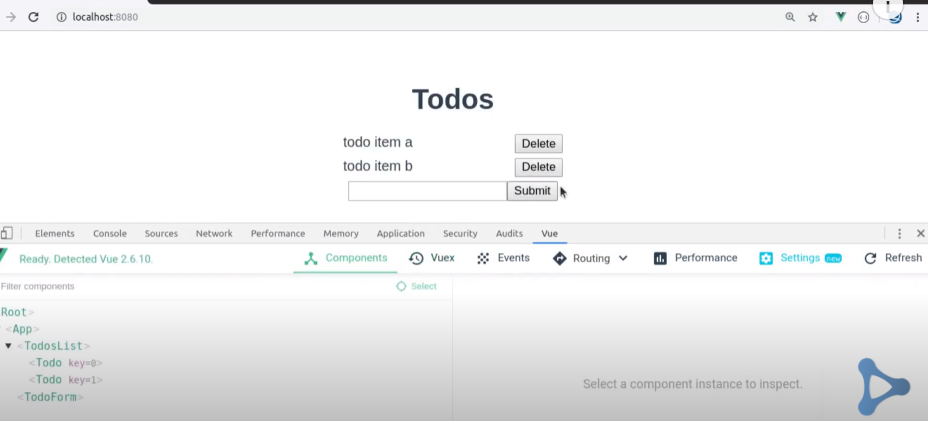
After clicking on delete the todo item will get deleted immideately
OUTPUT