 Python Development
 PHP Development
 React Js Development
 Vue Js Development
 Node Js Development
 Angular Development
 Continuous Integration
 Automated Deployment
 Monitoring and Logging
 Security Integration
 Backup and Recovery Automation
 Collaborative Tools Integration
 RPA Strategy and Roadmap
 RPA Tool Selection
 RPA Bot Development
 RPA Maintenance and Support
 Custom RPA Solution
 RPA Vendor Assessment
 AWS Lambda
 Amazon DynamoDB
 AWS CloudFormation
 Azure Deployment
 DNS Mapping
 Data Visualization
 Big Data Processing
 Data Modeling
 Database Administration
 Cloud Data Services
 Data Migration
 ETL Orchestration
 Data Collaboration
 Responsive Web Design
 Web Redesigning
 Mobile App Design
 UI/UX Design
 Wordpress Theme Design
 Online Portfolio Design
 SEO
SEO SMO
SMO PPC
PPC ORM
ORM
Table of Content
- **Introduction
. Overview of React app optimization . Benefits of optimizing React app code . Common performance issues in React apps
- **Profiling React Apps
. Using the React Profiler to identify performance issues . Analyzing data from the React Profiler . Making targeted optimizations based on profiler data
- **Code Optimization Techniques
. Memorization with React.Memo() . Reducing component re-renders with shouldComponentUpdate() . Optimizing event handlers with useCallback() . Using the useMemo() hook for memorizing values . Lazy loading with React.lazy() and Suspense . Code splitting with webpack
- **Rendering Performance
. Avoiding index as keys . Improving rendering performance with the React Context API
- **Network Performance
. Using code splitting to reduce initial load time . Minimizing network requests with server-side rendering (SSR)
Introduction
Before optimizing a React application, we must understand how React updates its UI and how to measure an app’s performance.This makes it easy to solve any React performance problems. Let’s start by reviewing how the React UI updates.
When we create a rendered component, React creates a virtual DOM for its element tree in the component. Now, whenever the state of the component changes, React recreates the virtual DOM tree and compares the result with the previous render.
It will only update the changed element in the actual DOM through diffing.
Overview of React app optimization
React app optimization involves improving the performance of your React application by reducing its load time,minimizing its memory usage, and making it more responsive.Optimization can help ensure that your application runs smoothly and efficiently, even as it grows in complexity and user traffic
Benefits of optimizing React app code
. Improved performance: By optimizing your code, you can reduce the time it takes for your app to load and respond to user interactions, . leading to a better user experience. This can include things like optimizing component rendering, reducing the size of your app’s JavaScript bundle, and minimizing unnecessary network requests.
. Reduced costs: A faster, more performant app can reduce your hosting costs, as you’ll need fewer resources to handle the same amount of traffic. Additionally, by optimizing your code, you may be able to reduce the amount of time and resources you need to spend on maintenance and debugging.
. Better user engagement: A faster, more responsive app can improve user engagement and satisfaction, leading to better retention and conversion rates.
. Improved SEO: Search engines like Google consider page load times as a ranking factor. By optimizing your app’s code and reducing its load time, you can improve its search engine rankings and attract more organic traffic.
. Easier to maintain: By optimizing your code, you can make it more modular and easier to maintain over time. This can include things like refactoring complex components into simpler ones, reducing the number of dependencies your app relies on, and using best practices like code splitting and lazy loading.
Common performance issues in React apps
There are several common performance issues that can arise in React apps, including:
. Unnecessary re-renders: React’s reactivity model means that changes to any part of the app’s state can trigger a re-render of the entire component tree. If your components are unnecessarily re-rendering, it can slow down your app and reduce its performance.
. Large component trees: As your app grows in complexity, it’s easy to end up with deeply nested component trees that can be slow to render and update. This can be exacerbated by unnecessary re-renders and other performance issues.
. Inefficient data fetching: If your app needs to fetch data from an API or other external source, inefficient data fetching can lead to slow page load times and reduced user engagement.
. Bloated JavaScript bundles: Large JavaScript bundles can take a long time to download and parse, slowing down your app’s load time and increasing its memory usage.
. Memory leaks: If your app has memory leaks, it can cause your app to slow down or crash over time.
. Improper use of state: Improper use of state, such as using setState() in a loop or rendering a large number of elements, can cause performance issues in your app.
. Unoptimized images: Large or unoptimized images can slow down your app’s load time and increase its memory usage.
To address these performance issues, you can use tools like React Profiler, Chrome DevTools, and Lighthouse to identify and diagnose performance bottlenecks in your app. Additionally, you can use best practices like code splitting, lazy loading, and caching to optimize your app’s performance and improve its user experience.
Profiling React App
Profiling React apps involves measuring the performance of your application in order to identify performance bottlenecks, optimize the application and ensure a smooth user experience. Profiling is important because as your React application grows in complexity, it can become slower and less responsive, leading to a poor user experience. Profiling your React app can help you identify which parts of your app are causing performance issues, allowing you to optimize them and improve overall performance.
There are several tools available to profile React apps, including the built-in Chrome DevTools Performance tab, React DevTools Profiler, and other third-party tools like the Performance Timeline API, Flamegraphs, and CPU profilers.
Profiling in React can be done using various tools and libraries.
Here are some steps to add profiling in a React app using the built-in React DevTools Profiler:
Install React DevTools: The React DevTools is a browser extension that allows you to Inspect and profile React components. You can install it from the Chrome Web Store or Firefox Add-ons.
Import React Profiler: In your React app, import the Profiler component from the react library.
“` import React, { Profiler } from ‘react’;
“`
Wrap components with the Profiler component: Wrap the components you want to profile with the Profiler component, and give it an id and onRender prop.
The id prop is a unique identifier for the component being profiled, and the onRender prop is a function that is called every time the component is rendered. You can use the onRender function to log data or send it to a third-party tool for analysis.
Define the onRender callback function: Define the onRender function that will be called by the Profiler component. This function will receive three arguments: id, phase, and actualDuration.
const callback = (id, phase, actualDuration) => { console.log(${id} took ${actualDuration} ms to render); };
In this example, the onRender function logs the time taken to render the component.
Open React DevTools: Open the React DevTools extension in your browser and select the “Profiler” tab.Here you will be able to see a visualization of your component’s performance data.
Analyze the data: Use the data in the DevTools Profiler to identify areas of your app that may be causing performance issues, and optimize your code accordingly.
Analyzing data from the React Profiler
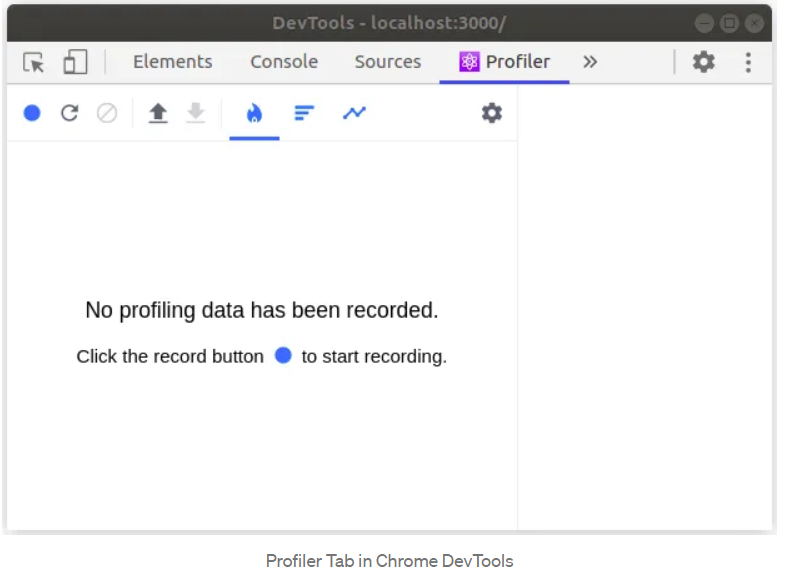
If your application supports React Profiler, you can see the above initial screen in DevTools under the ⚛ Profiler tab. We’ll be looking at two main topics.
Performance Profiling a React application
Profiling a React application is very easy. It involves only 3 steps.
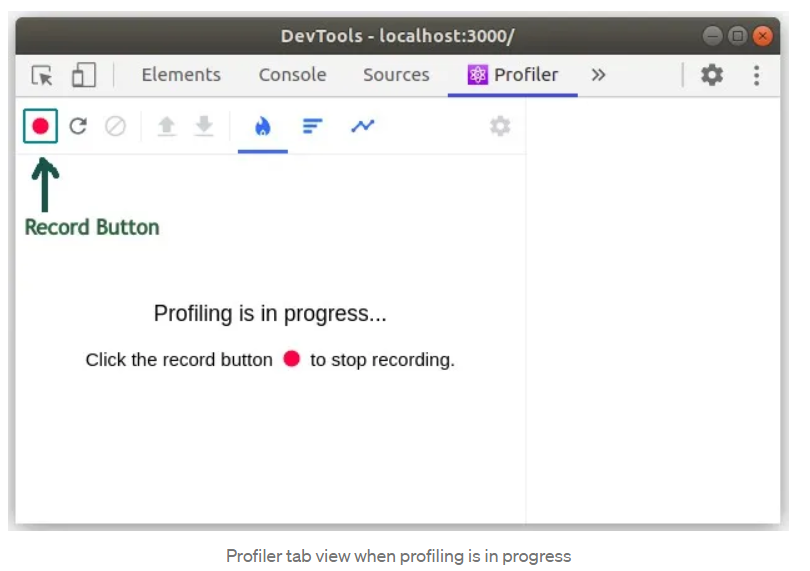
. Click the Record button in the Profiler tab
. Use your application as you usually would. (The Profiler will gather information about application re-renders at this stage)
. Click the Record button again to finish recording (You may also have a separate Stop button to finish recording based on the browser you use).
### Making targeted optimizations based on profiler data
Usually, React works in two phases: the render phase and the commit phase.
- Flame Chart
- Ranked Chart
- Interaction Chart
- Component Chart
Here are some steps you can follow to make targeted optimizations based on profiler data:
. Collect profiling data: Use a profiling tool to measure the performance of your code. There are many profiling tools available for different programming languages, such as PyCharm, Visual Studio, Xcode, and many others.
. Analyze the profiling data: Look at the profiling data to identify the areas of your code that are using the most resources or taking the most time to execute. This could include functions or loops that are being called repeatedly or inefficiently, or memory-intensive operations that could be optimized.
. Prioritize optimizations: Based on the analysis of the profiling data, prioritize the optimizations that are most likely to have the biggest impact on performance. Focus on the areas that are using the most resources or taking the most time to execute.
. Make targeted optimizations: Once you have identified the areas to optimize, use targeted optimizations to improve their performance. This could include refactoring code to eliminate unnecessary operations, optimizing algorithms,or using more efficient data structures.
. Test and verify: After making optimizations, test and verify that they have improved performance. Use the profiling tool to measure the performance of the optimized code and compare it to the original profiling data. If the optimizations have been successful, you should see a noticeable improvement in performance.
. Iterate: If necessary, repeat the process by collecting new profiling data and analyzing it to identify further areas for optimization.
Code Optimization Techniques
Memorization with React.Memo()
Memoization is a programming technique used to improve the performance of functions by caching the results of expensive function calls and returning the cached result when the same inputs occur again.
In JavaScript, memoization can be implemented by creating a higher-order function that takes in the original function and returns a new function that caches the results of the original function. Here’s an example:
function memoize(func) { const cache = {}; return function(…args) { const key = JSON.stringify(args); if (key in cache) { return cache[key]; } else { const result = func.apply(this, args); cache[key] = result; return result; } }; }
function expensiveOperation(x, y) { console.log(‘Executing expensiveOperation…’); return x * y; }
const memoizedOperation = memoize(expensiveOperation);
console.log(memoizedOperation(2, 3)); // Output: Executing expensiveOperation… 6 console.log(memoizedOperation(2, 3)); // Output: 6 (cached)
Using the useMemo() hook for memorizing values
useMemo is a built-in hook in React that allows you to memorize the results of a function and recompute the results only when the dependencies of the function change. This can help optimize the performance of your application by avoiding unnecessary re-renders.
Here’s an example of using useMemo:
import React, { useState, useMemo } from ‘react’;
function App() { const [num1, setNum1] = useState(0); const [num2, setNum2] = useState(0);
const sum = useMemo(() => { console.log(‘Computing sum…’); return num1 + num2; }, [num1, num2]);
return (
setNum1(Number(e.target.value))} /> setNum2(Number(e.target.value))} />Sum: {sum}
); } In this example, we have two input fields that allow the user to enter two numbers. We want to compute and display the sum of these two numbers, but we only want to recompute the sum when either num1 or num2 changes.
To achieve this, we use useMemo to memoize the function that computes the sum. The first argument to useMemo is the function that computes the sum, and the second argument is an array of dependencies that tells React when to recompute the sum. In this case, the dependencies are num1 and num2.
When the user changes the value of num1 or num2, React will recompute the sum only if the new values of num1 or num2 are different from their previous values. If the values haven’t changed, React will return the cached result of the previous computation.
Optimizing event handlers with useCallback()
useCallback is a built-in hook in React that allows you to memoize a function and re-create the function only when its dependencies change.This can help optimize the performance of your application by avoiding unnecessary re-renders.
Here’s an example of using useCallback:
import React, { useState, useCallback } from ‘react’;
function App() { const [count, setCount] = useState(0);
const increment = useCallback(() => { setCount(prevCount => prevCount + 1); }, []);
return (
Count: {count}
); }
In this example, we have a button that, when clicked, increments a count. We want to use useCallback to memorize the increment function so that it only gets re-created when the setCount function changes.
The first argument to useCallback is the function to memoize, and the second argument is an array of dependencies that tells React when to re-create the function. In this case, we don’t have any dependencies, so we pass an empty array [].
When the user clicks the button, the increment function is called, which in turn calls the setCount function to update the count. Because we’ve memoized the increment function using useCallback, React will only re-create the function if the setCount function changes. Otherwise, it will return the cached function from the previous render.
Difference between UseCallback and UseMemo

Reducing component re-renders with shouldComponentUpdate()
shouldComponentUpdate() is a lifecycle method in React that allows you to control whether a component should re-render or not. By default, a component will re-render whenever its state or props change, but you can use shouldComponentUpdate() to optimize performance by preventing unnecessary re-renders.
Here’s an example of using shouldComponentUpdate() to prevent a component from re-rendering unnecessarily:
class MyComponent extends Component { shouldComponentUpdate(nextProps, nextState) { if (this.props.name === nextProps.name && this.state.count === nextState.count) { return false; } return true; }
render() { return (
Name: {this.props.name}
Count: {this.state.count}
); } }
Lazy loading with React.lazy() and Suspense
Lazy Loading
Lazy loading, also known as code splitting, is a technique used in React to improve the performance of your application by loading only the necessary code at the time of rendering. It allows you to split your code into smaller chunks and load them on demand, rather than loading all the code at once.
In a typical React application, all the components are bundled together in a single file, which can be quite large. When the user navigates to a page, the entire bundle is loaded, including components that may not be needed right away. This can slow down the initial load time of your application and cause unnecessary delays.
With lazy loading, you can split your code into smaller chunks and load only the code that is needed for a particular page or component. For example, if your application has a dashboard page and a settings page, you can split the code for each page into separate bundles and load them on demand, as needed.
Here’s an example of using lazy loading in React:
import React, { Component } from ‘react’;
import React, { lazy, Suspense } from ‘react’;
const Dashboard = lazy(() => import(‘./Dashboard’)); const Settings = lazy(() => import(‘./Settings’));
function App() { return (
}>
); }
In this example, we’ve used the lazy() function to import the Dashboard and Settings components. The lazy() function creates a new component that loads the actual component on demand, when it’s needed.
We’ve also used the Suspense component to handle the loading of the lazy-loaded components. The Suspense component allows you to specify a fallback component that will be rendered while the lazy-loaded component is being loaded.
Benefits of Lazy loading React components
The concept of lazy loading our React components is really simple.
Load the minimal code to the browser that will render a page.
Load additional small chunks of code when needed.
By loading less JavaScript code to the browser, that will default to better performance and better TTI results.
The concept of lazy loading may apply to any JavaScript application, but for the sake of simplicity will keep it to React talk.
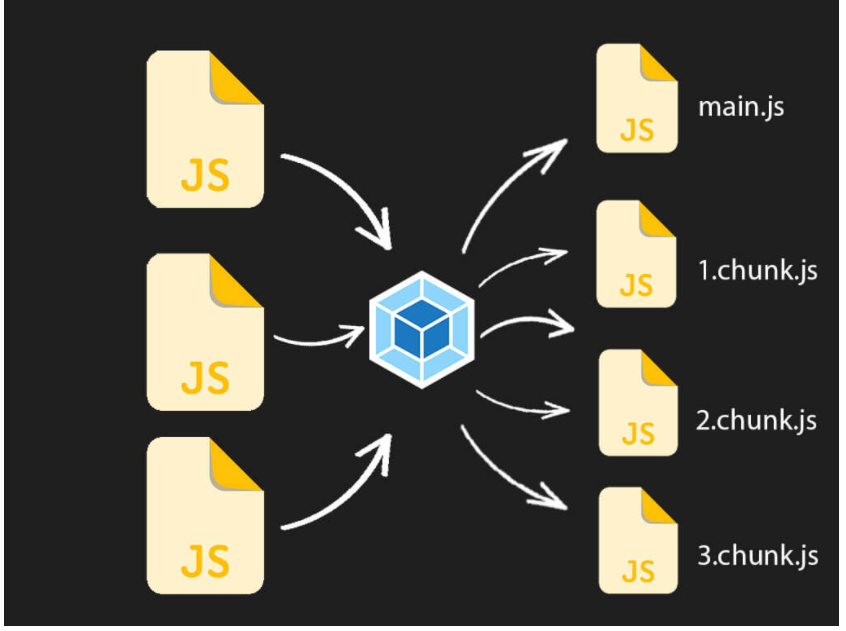
Code splitting with webpack
Webpack is a popular module bundler for JavaScript applications. It takes in multiple modules (such as JavaScript files, CSS files, and images) and bundles them into a single file that can be served to the client.
Webpack has many features that make it a powerful tool for building complex applications. Some of its key features include:
Code splitting: Webpack can split code into multiple bundles, which can be loaded on demand as needed, improving performance by reducing the initial load time of the application.
Plugins: Webpack has a rich ecosystem of plugins that can be used to optimize the build process, perform code analysis, and automate tasks.
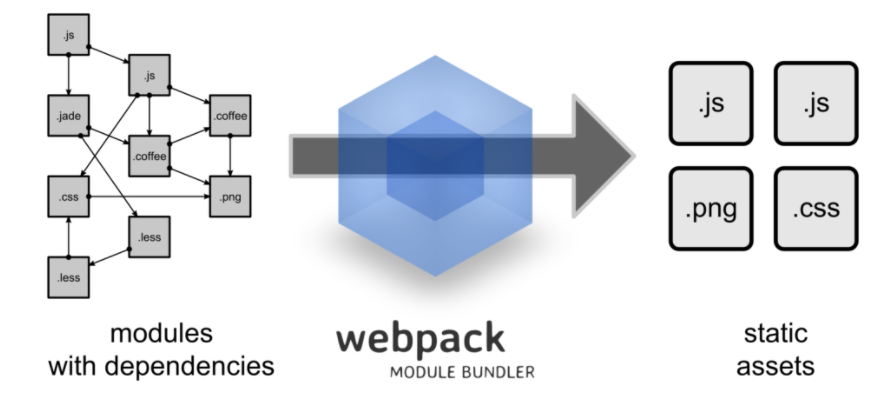
Loaders: Webpack can process files of different types using loaders, which can transform the file into a format that can be used by the application.
Hot module replacement: Webpack can update modules in real-time without reloading the entire page, allowing developers to see changes immediately without disrupting their workflow.
const path = require(‘path’);
module.exports = { entry: ‘./src/index.js’, output: { filename: ‘bundle.js’, path: path.resolve(__dirname, ‘dist’), }, module: { rules: [ { test: /.js$/, exclude: /(node_modules)/, use: { loader: ‘babel-loader’, options: { presets: [‘@babel/preset-env’] } } } ] } };
Rendering Performance
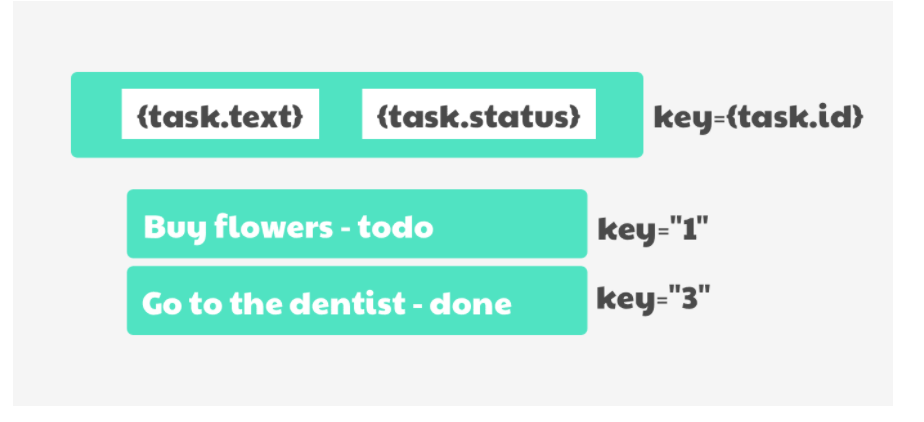
In React, it’s generally recommended to avoid using the index of an array as the key when rendering a list of elements. While this approach may work in simple scenarios, it can lead to issues with performance and correctness in more complex scenarios.
Here are some reasons why using index as keys may not perform well:
Reordering: If the order of items in the list changes, React will have to re-render all the elements, which can be inefficient.
Addition/Removal: If new items are added to the list or old items are removed, React may have to re-render more elements than necessary if the key values are not unique.
Stability: If the key values are not stable (i.e. they change frequently), React may have to re-render more elements than necessary, even if the order and number of elements remain the same.
Avoiding index as keys
function ItemList({ items }) { return (
-
- {items.map(item => (
- {item.name}
))}
); }
In this example, we’re using the id property of each item as the key. This ensures that the key value is both unique and stable, so React can efficiently update the list when changes are made.e key values are not stable (i.e. they change frequently), React may have to re-render more elements than necessary, even if the order and number of elements remain the same.
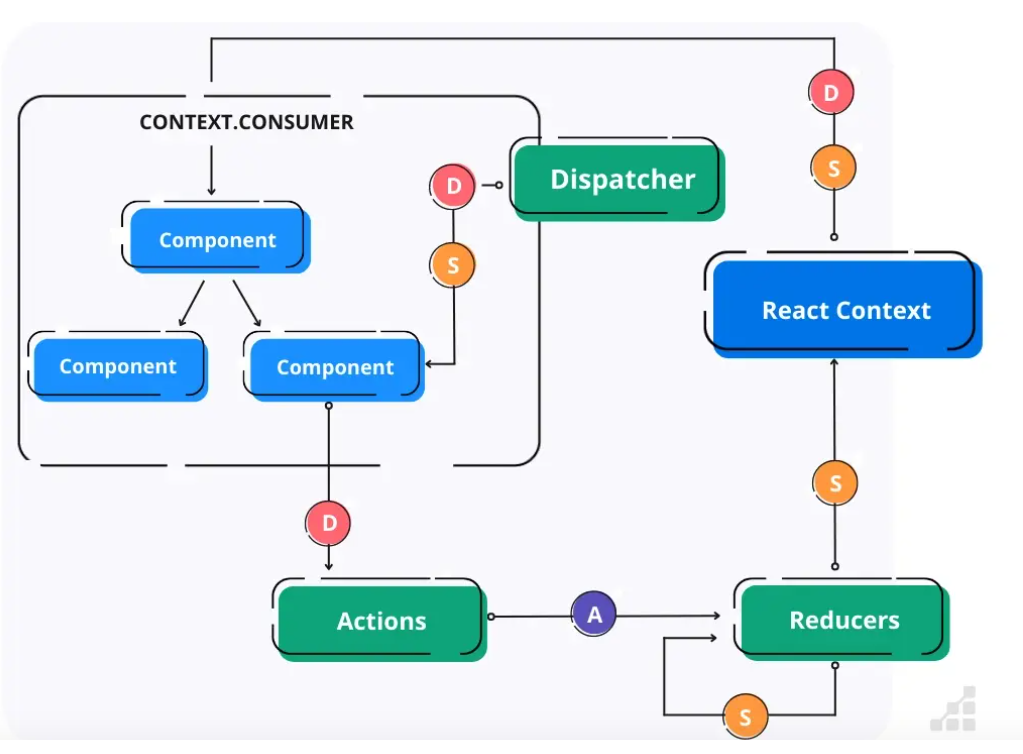
Improving rendering performance with the React Context API
The React Context API is a powerful tool for sharing data between components without having to pass props down through multiple levels of the component tree. In addition to simplifying the code, using context can also improve rendering performance by reducing the number of unnecessary re-renders.
Here are some ways in which using the React Context API can improve rendering performance:
. Avoids prop drilling: By using context, you can avoid passing props down through multiple levels of the component tree, which can simplify the code and reduce the number of props that need to be passed around.
. Reduces unnecessary re-renders: When a component’s props change, React will re-render the component and its children, even if the change does not affect the children. By using context, you can ensure that only the components that actually depend on the context value will re-render when the value changes.
. Optimizes memoization: When using the useMemo or useCallback hooks, you can optimize memoization by passing the context value as a dependency. This ensures that the hook will only be re-evaluated when the context value changes, and not unnecessarily when other props or state change
// Create the context const MyContext = React.createContext({});
// Create a provider component that will wrap the component tree function MyProvider({ children }) { const [value, setValue] = useState({}); // The context value
return ( {children} ); }
// Use the context in a child component function MyChildComponent() {
const value = useContext(MyContext);
// Do some expensive computation based on the context value const result = useMemo(() => { // … }, [value]);
return
; }
// Use the provider component in the app function App() { return ( ); }
Network Performance
Optimizing images with lazy loading and responsive images
Optimizing images with lazy loading and responsive images can significantly improve website performance and user experience.
Lazy loading is a technique where images are only loaded when they are visible on the screen, rather than loading all images at once. This reduces the initial page load time and data usage, especially for pages with a lot of images or long-scrolling pages.
Responsive images are images that can adapt to different screen sizes and device types, ensuring that the user is served the appropriate image size for their device.
This helps to reduce page load time and data usage, especially for mobile devices with slower connections.
Here are some tips for optimizing images with lazy loading and responsive images:
Use a lazy loading plugin or script: There are many plugins and scripts available for lazy loading images, such as LazyLoad or Intersection Observer. These can be easily integrated into your website to automatically lazy load images.
Optimize image size and quality: Before uploading images to your website, make sure to optimize them for web use. This includes reducing the file size without sacrificing image quality, and using the appropriate image format (JPEG for photographs, PNG for graphics). There are many online tools available for image optimization, such as TinyPNG or Kraken.io.
Use responsive images: To ensure that your images are optimized for different screen sizes and device types, use responsive images. This involves using HTML and CSS to serve different image sizes based on the device viewport width. There are many tools and plugins available to help with this, such as the WordPress plugin Responsive Images.
Use the “srcset” and “sizes” attributes: When using responsive images, make sure to use the “srcset” and “sizes” attributes in your image tags. This tells the browser which image size to load based on the device viewport width.
Test your website performance: Use tools like Google PageSpeed Insights or GTmetrix to test your website’s performance and identify areas for optimization. These tools can also provide recommendations for improving your website’s loading speed and user experience.
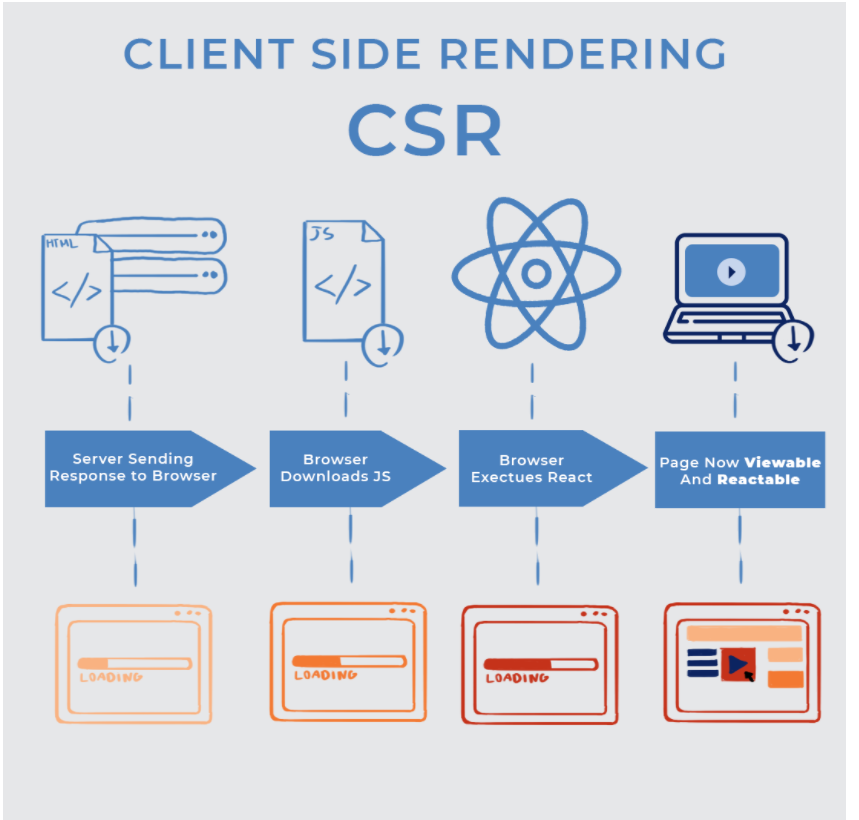
Minimizing network requests with server-side rendering (SSR)
Server-side rendering (SSR) in React can help minimize network requests by pre-rendering the initial HTML content on the server before sending it to the client, instead of relying on client-side JavaScript to render the content. This can result in faster page load times and improved SEO, as search engines can more easily crawl the pre-rendered HTML content.
Here are some steps to implement server-side rendering in React to minimize network requests:
. Set up a server: You will need to set up a server to handle the SSR process. You can use Node.js with Express, Next.js, or another server-side rendering framework to handle the rendering and serve the pre-rendered HTML content.
. Create a server-side rendering function: You will need to create a server-side rendering function that takes in the requested URL and renders the appropriate React components into HTML on the server. This can be done using the ReactDOMServer.renderToString() method.
. Add a route to handle server-side rendering: You will need to add a route to your server that handles the server-side rendering function and sends the pre-rendered HTML content back to the client.
. Update your client-side code: To ensure that the client-side JavaScript does not re-render the content after the server-side rendering, you will need to update your client-side code to hydrate the pre-rendered HTML content instead of rendering it from scratch.
. Test and optimize: Once you have implemented server-side rendering, you will need to test your website and optimize it for performance. Use tools like Google PageSpeed Insights or GTmetrix to identify areas for optimization and improve your website’s loading speed and user experience.
Conclusion
There are many ways to optimize a React app, for example lazy loading components, using ServiceWorkers to cache application state, considering SSR, avoiding unnecessary renders etc.. That said, before considering optimization, it’s worth understanding how React components work, understanding diffing algorithms, and how rendering works in React.
These are all important concepts to take into consideration when optimizing your application.
I think optimization without measuring is almost premature, which is why I would recommend benchmark and measure performance first. You can consider profiling and visualizing components with Chrome Timeline.This lets you see which components are unmounted, mounted, updated, and how much time they take relative to each other. It will help you to get started with your performance optimization journey.